source code 는 아래 github 에서 받을 수 있습니다.
https://github.com/nanbean/springReact 의 spring-jpa branch해당 source code 받지 말고 아래대로 차근 차근 scratch 부터 만들어 보는 것을 추천합니다.
# 해당 source code 를 통해서 동작성을 빠르게 확인하려면,
$ git clone -b spring-jpa https://github.com/nanbean/springReact.git lcms
$ cd lcms
$ mvn spring-boot:run
이후 REST API 동작성 확인 으로 이동하시면 됩니다.
이전 spriing react 최신 기준으로 시작합니다.(Spring boot React)
spring-boot-devtools, h2, JPA, hsqldb, lombok 을 Dependency 에 추가
1. 이전 project 에서 pom.xml 의 dependency 에 spring-boot-devtools, h2, jpa, hsqldb, lombok 을 추가한다. dependencies 하위에 추가합니다.
		<dependency>
			<groupId>org.springframework.boot</groupId>
			<artifactId>spring-boot-devtools</artifactId>
		</dependency>

		<dependency>
			<groupId>com.h2database</groupId>
			<artifactId>h2</artifactId>
			<scope>runtime</scope>
		</dependency>


		<dependency>
			<groupId>org.springframework.boot</groupId>
			<artifactId>spring-boot-starter-data-jpa</artifactId>
		</dependency>

		<dependency>
			<groupId>org.hsqldb</groupId>
			<artifactId>hsqldb</artifactId>
			<scope>runtime</scope>
		</dependency>

		<dependency>
			<groupId>org.projectlombok</groupId>
			<artifactId>lombok</artifactId>
			<optional>true</optional>
		</dependency>
Content.java 추가
1. src/main/java/com/lge/lcms/content 디렉토리를 만들고 Content.java 파일을 하위에 생성합니다.
title 과 genre 만 가진 간단한 Entity 입니다.
package com.lge.lcms.content;

import lombok.Builder;
import lombok.Getter;
import lombok.NoArgsConstructor;

import javax.persistence.Entity;
import javax.persistence.GeneratedValue;
import javax.persistence.Id;
import javax.persistence.Table;
import javax.persistence.Column;

@NoArgsConstructor
@Table
@Getter
@Entity
public class Content {

	@Id
	@GeneratedValue
	private Long id;

	@Column
	private String title;

	@Column
	private String genre;

	@Builder
	public Content(String title, String genre) {
		this.title = title;
		this.genre = genre;
	}
}
ContentRepository.java 파일 추가
1. src/main/java/com/lge/lcms/content 하위에 ContentRepository.java 파일을 추가합니다.
package com.lge.lcms.content;

import org.springframework.data.jpa.repository.JpaRepository;

public interface ContentRepository extends JpaRepository<Content, Long> {

}
ContentRepositoryTest.java 파일 추가
1. src/test/java/com/lge/lcms/content 하위에 ContentRepository.java 파일을 추가합니다.
package com.lge.lcms.content;

import static org.hamcrest.CoreMatchers.is;
import static org.junit.Assert.assertThat;

import org.junit.Test;
import org.junit.After;
import org.junit.runner.RunWith;
import org.springframework.boot.test.context.SpringBootTest;
import org.springframework.test.context.junit4.SpringRunner;
import org.springframework.beans.factory.annotation.Autowired;

import java.util.List;

@RunWith(SpringRunner.class)
@SpringBootTest
public class ContentRepositoryTest {

		@Autowired
		ContentRepository contentRepository;

		@After
		public void cleanup() {
			contentRepository.deleteAll();
		}

		@Test
		public void getTest() {
			contentRepository.save(Content.builder()
				.title("Incredible")
				.genre("Action")
				.build());

			List<Content> contentList = contentRepository.findAll();

			Content content = contentList.get(0);
			assertThat(content.getTitle(), is("Incredible"));
			assertThat(content.getGenre(), is("Action"));
		}
}
Test 실행
1. Test 를 통해서 Build 가 정상적으로 되는지 Test Result 가 정상인지 확인 합니다.
$ mvn test
...
...
[INFO]
[INFO] Results:
[INFO]
[INFO] Tests run: 2, Failures: 0, Errors: 0, Skipped: 0
[INFO]
[INFO] ------------------------------------------------------------------------
[INFO] BUILD SUCCESS
[INFO] ------------------------------------------------------------------------
[INFO] Total time: 29.654 s
[INFO] Finished at: 2019-01-30T13:36:29+09:00
[INFO] Final Memory: 42M/576M
[INFO] ------------------------------------------------------------------------
Rest API 추가
1. src/main/java/com/lge/lcms/web 디렉토리를 만들고 ContentRestController.java 파일을 하위에 생성합니다.
rest/content REST API 를 만듭니다.
package com.lge.lcms.web;

import com.lge.lcms.dto.ContentSaveRequestDto;
import com.lge.lcms.content.ContentRepository;
import org.springframework.web.bind.annotation.RequestMapping;
import org.springframework.web.bind.annotation.GetMapping;
import lombok.AllArgsConstructor;
import org.springframework.web.bind.annotation.PostMapping;
import org.springframework.web.bind.annotation.RequestBody;
import org.springframework.web.bind.annotation.RestController;

@RestController
@AllArgsConstructor
@RequestMapping("/rest")
public class ContentRestController {

	private ContentRepository contentRepository;

	@PostMapping("/content")
	public void savePosts(@RequestBody ContentSaveRequestDto dto){
		contentRepository.save(dto.toEntity());
	}
}
DTO 추가
1. src/main/java/com/lge/lcms/dto 디렉토리를 만들고 ContentSaveRequestDto.java 파일을 하위에 생성합니다.
View 를 생성합니다. View 와 Entity 는 구분하는 것이 좋습니다.
package com.lge.lcms.dto;

import com.lge.lcms.content.Content;
import lombok.NoArgsConstructor;
import lombok.Setter;
import lombok.Getter;

@Getter
@Setter
@NoArgsConstructor
public class ContentSaveRequestDto {

		private String title;
		private String genre;

		public Content toEntity(){
			return Content.builder()
				.title(title)
				.genre(genre)
				.build();
		}
}
REST API 동작성 확인
1. H2 활성화, src/main/resources/application.properties 에 아래 내용을 추가합니다.
H2 DB 를 웹브라우저를 통해서 접근하기 위해서입니다.
spring:
	h2:
		console:
			enabled: true
2. spring boot 실행
$ mvn spring-boot:run
3. post 수행
$ curl --header "Content-Type: application/json" --request POST --data '{"title": "Incredible","genre": "Action"}' http://localhost:8080/rest/content
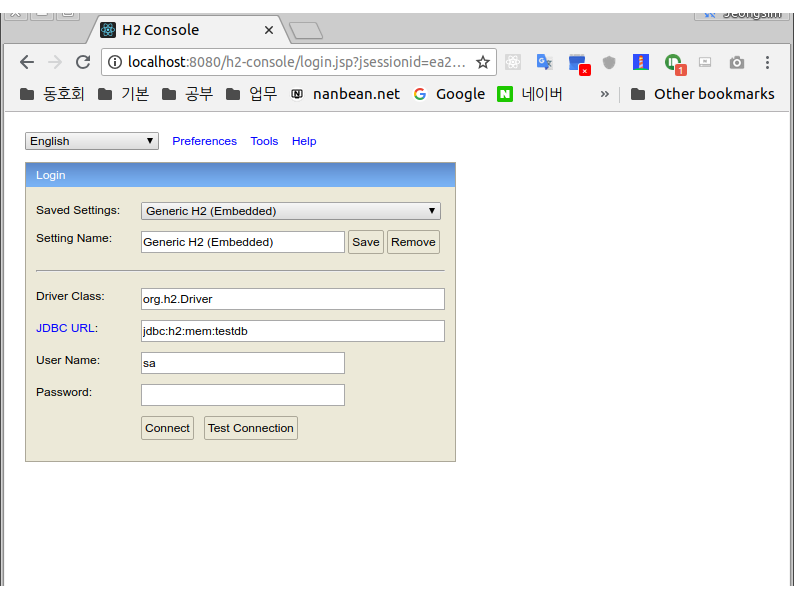
4. 입베디드 H2 consle 진입
브라우저 주소창에 http://localhost:8080/h2-console 을 입력합니다.
5. connect
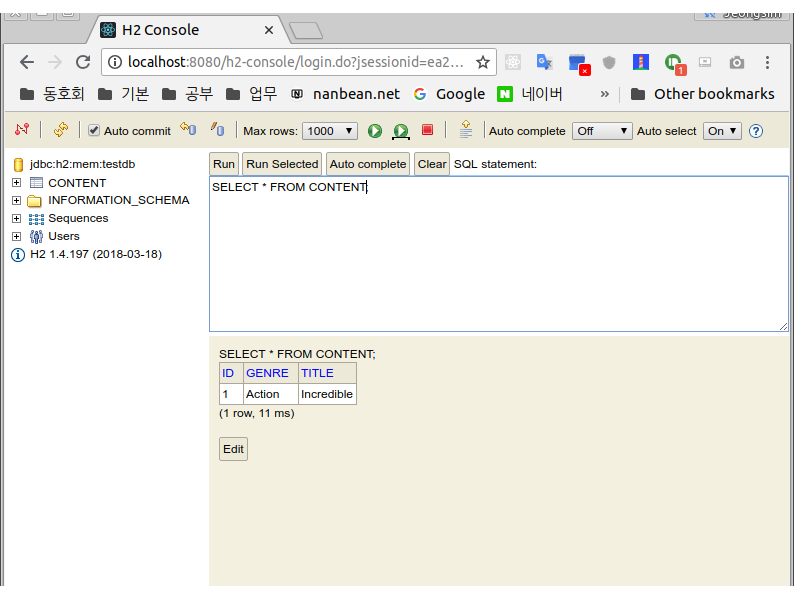
JDBc URL 에 jdbc:h2:mem:testdb 을 입력하고 connect 를 눌러서 진입합니다.
7. query 를 통해서 POST API 동작 확인합니다.
아래 query 를 입력하고 Run 버튼을 누릅니다.
SELECT * FROM CONTENT;