source code 는 아래 github 에서 받을 수 있습니다.
https://github.com/nanbean/springReact
해당 source code 받지 말고 아래대로 차근 차근 scratch 부터 만들어 보는 것을 추천합니다.
# 해당 source code 를 통해서 동작성을 빠르게 확인하려면,
$ git clone https://github.com/nanbean/springReact.git lcms
$ cd lcms
$ mvn clean install
$ java -jar target/lcms-0.0.1-SNAPSHOT.jar
후
browser 에서 http://localhost:8080/ 접속하면 됩니다.
Bootstrap 제작
spring 에서 제공하는 기본을 이용해서 skeleton code 를 만드는 과정입니다.
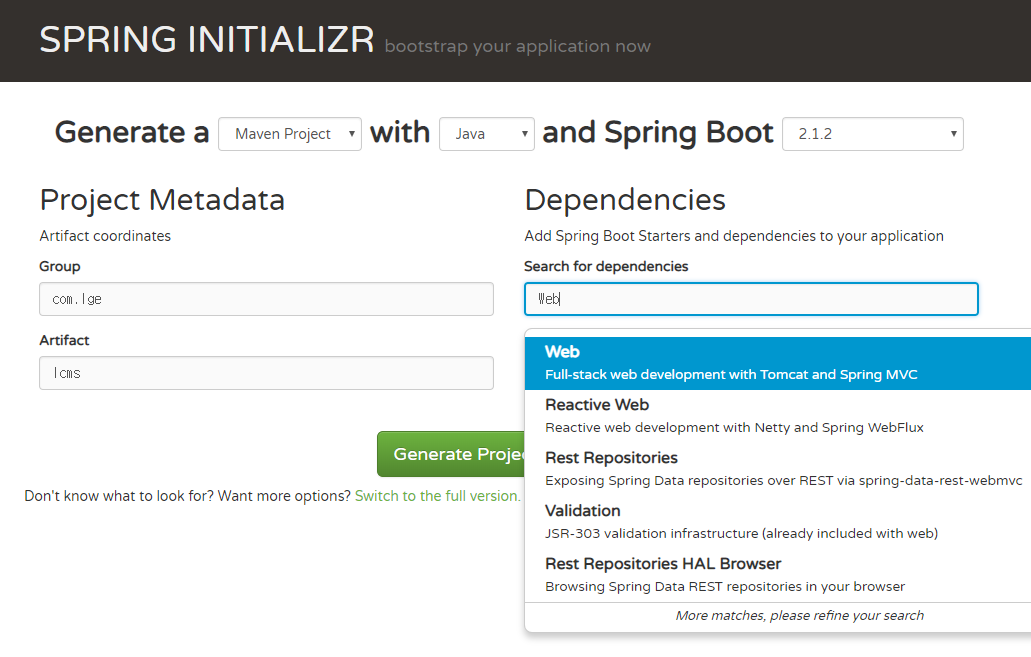
1. https://start.spring.io 에서 Gropu 에 com.lge, Artifact 에 lcms 입력, Web Dependencies 추가해서 Generate Project
2. 다운 받은 파일을 특정 폴더(spring-react)에 압축 풀기
tree 구조는 아래와 같습니다.
jeongsim.kim@ubuntu-n:~/work/lcms$ tree
.
├── mvnw
├── mvnw.cmd
├── pom.xml
└── src
    ├── main
    │   ├── java
    │   │   └── com
    │   │       └── lge
    │   │           └── lcms
    │   │               └── LcmsApplication.java
    │   └── resources
    │       ├── application.properties
    │       ├── static
    │       └── templates
    └── test
        └── java
            └── com
                └── lge
                    └── lcms
                        └── LcmsApplicationTests.java

14 directories, 6 files
기본 Controller 추가
Rest API 를 추가하는 작업입니다. (/api/hello)
1. src/main/java/com/lge/lcms/HelloController.java 파일 생성
package com.lge.lcms;

import org.springframework.web.bind.annotation.GetMapping;
import org.springframework.web.bind.annotation.RestController;

import java.util.Date;

@RestController
public class HelloController {
    @GetMapping("/api/hello")
    public String hello() {
        return "Hello, the time at the server is now " + new Date() + "\n";
    }
}
2. 실행
$ mvn spring-boot:run
3. 아래 curl 로 정상 동작 여부 확인 (다른 터미널에서)
$ curl http://localhost:8080/api/hello
Hello, the time at the server is now Tue Jan 29 14:41:10 KST 2019
React 추가
Front-end 로 React 를 사용하기 위해서 facebook 에서 만든 create-react-app 을 이용해서 React bootstrap 을 만드는 과정입니다.
1. 최상위 디렉토리에서 아래와 같이 frontend React Application 추가 (mvn spring-boot:run 종료하고)
$ create-react-app frontend
create-react-app 이 설치되어 있지 않다면?
$ npm install -g create-react-app
React 에 API 연결 추가
Front-end 인 React App 에서 spring 으로 Rest API 를 호출하여, 페이지에 그려주는 코드를 작성하는 것입니다.
1. frontend/src/App.js 파일을 아래와 같이 수정
import React, { Component } from 'react';
import logo from './logo.svg';
import './App.css';

class App extends Component {
    state = {};

    componentDidMount() {
        setInterval(this.hello, 250);
    }

    hello = () => {
        fetch('/api/hello')
            .then(response => response.text())
            .then(message => {
                this.setState({message: message});
            });
    }

    render() {
        return (
            <div className="App">
                <header className="App-header">
                    <img src={logo} className="App-logo" alt="logo" />
                    <h1 className="App-title">{this.state.message}</h1>
                    <p>
                        Edit <code>src/App.js</code> and save to reload.
                    </p>
                    <a
                        className="App-link"
                        href="https://reactjs.org"
                        target="_blank"
                        rel="noopener noreferrer"
                    >
                        Learn React
                    </a>
                </header>
            </div>
        );
    }
}

export default App;
Maven 으로 React Packaging 추가
maven 을 통해서 Front-end 인 React 를 build 하는 것입니다.
1. pom.xml 파일에 아래와 같이 plugin 추가(build/plugins 하위에 추가하면 됩니다.)
		<plugin>
			<groupId>com.github.eirslett</groupId>
			<artifactId>frontend-maven-plugin</artifactId>
			<version>1.6</version>
			<configuration>
				<workingDirectory>frontend</workingDirectory>
				<installDirectory>target</installDirectory>
			</configuration>
			<executions>
				<execution>
					<id>install node and npm</id>
					<goals>
						<goal>install-node-and-npm</goal>
					</goals>
					<configuration>
						<nodeVersion>v8.9.4</nodeVersion>
						<npmVersion>5.6.0</npmVersion>
					</configuration>
				</execution>
				<execution>
					<id>npm install</id>
					<goals>
						<goal>npm</goal>
					</goals>
					<configuration>
						<arguments>install</arguments>
					</configuration>
				</execution>
				<execution>
					<id>npm run build</id>
					<goals>
						<goal>npm</goal>
					</goals>
					<configuration>
						<arguments>run build</arguments>
					</configuration>
				</execution>
			</executions>
		</plugin>
2. mvn clean install 이 정상적으로 되는지 확인 (Error 가 뜨는지 안 뜨는지?)
$ mvn clean install
3. tree 구조 확인
frontend 하위에 build 가 정상적으로 생성되는지?(maven 이 npm 을 호출해서 build 를 잘 했는지 확인)
$ tree frontend/build
frontend/build
├── asset-manifest.json
├── favicon.ico
├── index.html
├── manifest.json
├── precache-manifest.18b2b7a023755c5bb0bcd527b6c170b9.js
├── service-worker.js
└── static
    ├── css
    │   ├── main.24e815be.chunk.css
    │   └── main.24e815be.chunk.css.map
    ├── js
    │   ├── 1.fa92c112.chunk.js
    │   ├── 1.fa92c112.chunk.js.map
    │   ├── main.21cc7467.chunk.js
    │   ├── main.21cc7467.chunk.js.map
    │   ├── runtime~main.229c360f.js
    │   └── runtime~main.229c360f.js.map
    └── media
        └── logo.5d5d9eef.svg

4 directories, 15 files
Spring boot jar 에 React 추가
maven 을 통해서 만들어진 Front-end 리소스들을 jar 에 추가하는 작업입니다.
1. pom.xml 에 plugin 추가
			<plugin>
				<artifactId>maven-antrun-plugin</artifactId>
				<executions>
					<execution>
						<phase>generate-resources</phase>
						<configuration>
							<target>
								<copy todir="${project.build.directory}/classes/public">
									<fileset dir="${project.basedir}/frontend/build"/>
								</copy>
							</target>
						</configuration>
						<goals>
							<goal>run</goal>
						</goals>
					</execution>
				</executions>
			</plugin>
2. mvn clean install 이 정상적으로 되는지 확인 (Error 가 뜨는지 안 뜨는지?)
$ mvn clean install
3. jar 파일에 public resource 가 정상적으로 포함되어 있는지 확인
$ jar tvf target/lcms-0.0.1-SNAPSHOT.jar | grep public
     0 Tue Jan 29 15:00:30 KST 2019 BOOT-INF/classes/public/
     0 Tue Jan 29 15:00:30 KST 2019 BOOT-INF/classes/public/static/
     0 Tue Jan 29 15:00:30 KST 2019 BOOT-INF/classes/public/static/media/
     0 Tue Jan 29 15:00:30 KST 2019 BOOT-INF/classes/public/static/css/
     0 Tue Jan 29 15:00:30 KST 2019 BOOT-INF/classes/public/static/js/
   306 Tue Jan 29 15:00:30 KST 2019 BOOT-INF/classes/public/manifest.json
322072 Tue Jan 29 15:00:30 KST 2019 BOOT-INF/classes/public/static/js/1.fa92c112.chunk.js.map
  1041 Tue Jan 29 15:00:30 KST 2019 BOOT-INF/classes/public/service-worker.js
  7959 Tue Jan 29 15:00:30 KST 2019 BOOT-INF/classes/public/static/js/main.21cc7467.chunk.js.map
  2828 Tue Jan 29 15:00:30 KST 2019 BOOT-INF/classes/public/static/css/main.24e815be.chunk.css.map
  1502 Tue Jan 29 15:00:30 KST 2019 BOOT-INF/classes/public/static/js/runtime~main.229c360f.js
  1706 Tue Jan 29 15:00:30 KST 2019 BOOT-INF/classes/public/static/js/main.21cc7467.chunk.js
   606 Tue Jan 29 15:00:30 KST 2019 BOOT-INF/classes/public/precache-manifest.18b2b7a023755c5bb0bcd527b6c170b9.js
   779 Tue Jan 29 15:00:30 KST 2019 BOOT-INF/classes/public/asset-manifest.json
  2062 Tue Jan 29 15:00:30 KST 2019 BOOT-INF/classes/public/index.html
  2671 Tue Jan 29 15:00:30 KST 2019 BOOT-INF/classes/public/static/media/logo.5d5d9eef.svg
  3870 Tue Jan 29 15:00:30 KST 2019 BOOT-INF/classes/public/favicon.ico
   984 Tue Jan 29 15:00:30 KST 2019 BOOT-INF/classes/public/static/css/main.24e815be.chunk.css
  7996 Tue Jan 29 15:00:30 KST 2019 BOOT-INF/classes/public/static/js/runtime~main.229c360f.js.map
112436 Tue Jan 29 15:00:30 KST 2019 BOOT-INF/classes/public/static/js/1.fa92c112.chunk.js
실행 확인
Front-end 와 Back-end 가 정상적으로 동작하는지 확인하는 것입니다.
1. java 로 실행 확인
$ java -jar target/lcms-0.0.1-SNAPSHOT.jar

  .   ____          _            __ _ _
 /\\ / ___'_ __ _ _(_)_ __  __ _ \ \ \ \
( ( )\___ | '_ | '_| | '_ \/ _` | \ \ \ \
 \\/  ___)| |_)| | | | | || (_| |  ) ) ) )
  '  |____| .__|_| |_|_| |_\__, | / / / /
 =========|_|==============|___/=/_/_/_/
 :: Spring Boot ::        (v2.1.2.RELEASE)
...
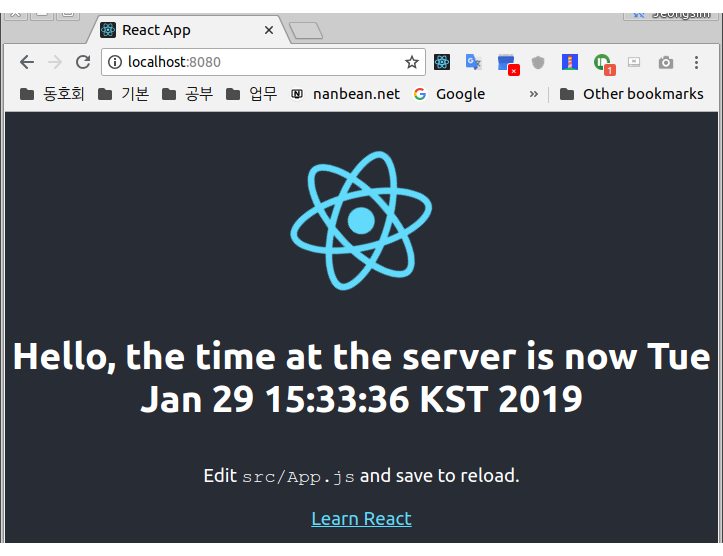
2. browser 에서 정상 동작 확인
One thought on “Spring boot React”